How to create Party flyer in Photoshop (.PSD)
")
If you don’t have a very big budget and need qualitative invitation, flyer or promotional template this lesson will be really very useful for you.
Here you will find such important information:
- What color modes, resolution and dimensions are necessary.
- How to add new guides.
- How create a background and make it blurred.
- How to add new objects.
- What instruments it is important to use.
- What image to add and how to do it.
- The process of adding logo and text.
- Get some advice how to become ready for digital printing.
And of course there are a lot of interesting details and useful techniques on how to make your work easy and more quickly.
Now let’s speak about the reason why a party flyer can be useful for you. First of all, every day in the world thousands of parties can be organized. It means that in each country and city, there are at least some parties every day. In this situation, it is very difficult to be always exclusive and original.
Many companies spend a lot of money on promotional campaigns. But, for example on our website now there are more than 2200 templates. Among them, you can find any themed flyers you need for your party, special events, anniversary, or holiday.
Having just basic knowledge of Photoshop, advertisement won’t be a problem for you anymore. It means that you can download any ready-made premium or free flyer template from our website and then make it really perfect, especially for your event!
And of course making editions yourself you can save a lot of time. If you don’t have a designer that works with you it would be necessary to find one, then make changes and it will takes you a lot of time. But if you know how to do it, there won’t be any problems anymore because usually, it is necessary only to change photos, logo and text.
We were trying to make this lesson easy for understanding and take into account all the details. That’s why we really hope that it can help you now and in the future to create flyers, customize them, and become more knowledgeable in graphic design. Enjoy the article and good luck with your projects!
Create a New Document
Step 1
Open Photoshop and create a new document with the dimensions 8,75h11,25 Inches. This is a standard size with allowances 0,25 Inches. It is necessary to set CMYK color mode and resolution up to 300 dots / inch because we are creating our flyer for printing.

Step 2
Add new guides that will indicate the area for cropping the flyer. For creating guides go to “View >> New Guide …” and select an item 0.25 in vertically.

Step 3
Repeat these steps for all of the edges of the document. Make sure that each guide is located in 0,25 In from the edge of the document.

Creating the background
Step 1
Add background image. For this open “File >> Place…” and choose the appropriate image.

Click to enlarge the image to fill the whole size of the document. In order not to lose the proportions, hold down the Shift key while enlarging.

Step 2
Add some blurring to the background. Open “Filter>> Blur >> Gaussian Blur…” and set the value to 4 Pixels.

Step 3
Now put palm leaves on the sides. For this open an image “File >> Place…” and put the leaves on the sideы using the mouse, while enlarging them to the required size.

Duplicate the palm leaf by selecting it and clicking in the layers “Layer >> Duplicate Layer …”.

Move the second layer of palm down, that it is all round the edge of the document. For this go to “Edit >> Free Transform” and place the image in the required place. Also you can use keyboard shortcut Ctrl + T.

Choose the both layers holding down the Ctrl key. Go to “Layer >> Merge Layers or clicking the key combination Ctrl + E, to combine the layers.

Once again copy the layer clicking “Layer >> Duplicate Layer …”. Now reflect it by going to the “Edit >> Transform >> Flip Horizontal”.

Move the layer to the right edge using the instrument “Move Tool”.

Adding the image
Step 1
Add a photo. Open the image “File >> Place…” and scale it to the whole size of the document.

Step 2
Crop the unnecessary part of the photo. To begin with you need to rasterize the image. Go to “Layer >> Rasterize >> Layer”.

Step 3
Take the instrument “Polygonal Lasso Tool”.

Select the unnecessary area of the image. Using the left mouse button press on the edge of the area, thereby selecting its. Enlarge the document scale using the instrument “Zoom Tool” for a more precise selection. And for moving use “Space” key.

To complete the selection connect the end point with the first one.

Erase the selected area choosing the instrument “Eraser Tool”.

Repeat the same operation for other areas.

Adding logo and text
Step 1
Write a title in white color using the font “Roboto” and the instrument “Horizontal Type Tool” (C = 0 M = 0 Y = 0 K = 0). The properties of text can be changed in “Character” tab.

Step 2
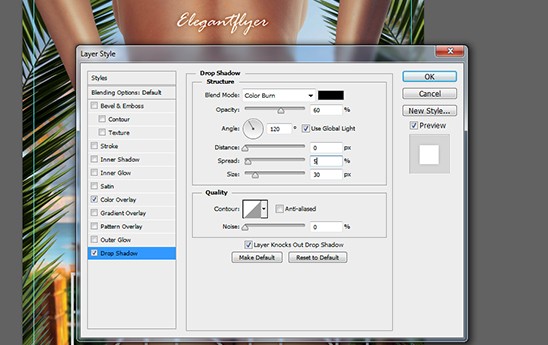
Add some shadow to the text. Choose the icon in layers and press down the “Add a layer style”. After this – “Drop Shadow…”.

Choose blending options “Color Burn” with an opacity 60%, Distance: 0 px, Spread: 15 %, Size: 30 px.

Step 3
Add the other text to the flyer.

Step 4
Place your logo at the top. Open it in “File >> Place…” and put it at the top in the center. Chose in the layers “Add a layer style” and after this “Blending Options…”.

Adding objects
Step 1
Add light and shadow. For this create a new layer between text and objects. Go to “Layer >> New >> Layer…” and use keyboard shortcuts Shift + Ctrl + N.

Create dark shadow above and below using the instrument “Gradient Tool”. For this you need to hold down the mouse button and draw from the top to the center of the document.

Change the options of the layer. Choose blending mode “Linear Burn” with the option Fill: 50 %.

Step 2
Now add some contrast to your flyer. In layers down below “Create new fill or adjustment layer”, and then “Levels…”.

Set the parameters as it is illustrated and move to the very top in layers.

In the same way add “Color Balance …” and set the parameters indicated in the illustration.

And “Curves…”.

Step 3
Add some light to the center. Choose the instrument “Gradient Tool” with the option “Radial Gradient” and draw with holding down mouse from the center till the edge of the document. The color is black (C = 75 M = 68 Y = 67 K = 90).

Change blending mode to “Color Dodge” with the option Fill: 30%.

Step 4
Now add some light on the sides. Using the instrument “Gradient Tool” with the option “Radial Gradient” draw with the holding down button of the mouse from the side of the document till the center using orange color (C = 0 M = 75 Y = 100 K = 0). Repeat the steps reducing radius and changing the color to yellow (C = 0 M = 75 Y = 100 K = 0).

Change blending mode to “Soft Light”. Duplicate the layer, flip it horizontally and place it on the other side.

Step 5
Select the date of event. For this use the instrument “Rectangle Tool”. Make the rectangle red (C = 0 M = 100 Y = 100 K = 0). Choose blending mode “Difference” with the option Fill: 60 %.

Step 6
The flyer is almost ready. Combine all the layers with the image of palm trees and use the instrument “Rectangular Marquee Tool”.

Select the rectangle area from side to side.

With the right mouse button select “Layer Via Copy”.

Move this layer above the rectangle.

Congratulations! You have made a good design of party flyer!

And remember, when you design documents for digital printing, do not forget about the requirements for printing. If you don’t know about some of them it would be better to have some consultations with the company that will print the document.


")


